Wednesday, 11 March 2015

RESTFull Webservice : Summarised overview

RESTfull Introduction :

It is a concept to create such an application who can response to client in multiple formats of data (xml, JSON, HTML etc).And this application you can say a "WEBSERVICE".

JAX-RS :

When RESTFull concept introduced in the market, after that Java supported this concept. JAVA created a specification JAX-RS. It is an API.

Jersey :

Jersey is a implementation  of JAX-RS. Jersey is full fledge API and can be use in applications to create a proper RESTfull webservice.

RESTfull - JAXB :

JAXB also supporting RESTfull to create response XML in minimum efforts. JAXB providing few annotations  (@XmlRootElement), which are helpfull to create RESTfull webservice in minimun code.

RESTfull - Spring4.0 :

Now Spring4.0 also providing some features, using which RESTFull webservice can be created very easily. 
@RestController is very important annotation which is used to create RESTFul webservice.

Hibernate : Dirty checking Vs Dynamic-update

Dirty Checking :
 Suppose a list of collections is there and few of them are updated/modified. Hibernate will verify updated/modified each collection and then it will save it to DB. This is called dirty checking.

Dynamic-upadate :

If a particular Entity is updated/modified with few columns and saving this to DB, this can be done using dynamic update property. In configuration file of table (Entity xml), dynamic-update=true can be mention to enable this feature of hibernate. Highly recommended to use this to save the time and increase the performance.

Dirty Checking : List of collections
Dynamic-update : Single Entity

If am wrong at any point, u people can correct me please...

Tuesday, 28 October 2014

Java code- Writing into text File

Writing to a file is a little easier than reading a file. To write to a file, we'll use two more inbuilt classes: the FileWriter class and the PrintWriter class.
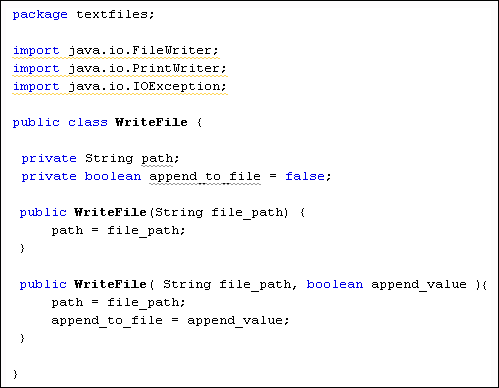
Create a new class in your project by clicking File > New File from the NetBeans menu. Select Java in the Categories section of the dialogue box and Class from the File Types list. Click the Next button at the bottom. For the Class name type WriteFile, then click Finish. Add the following three import statements your new code:
import java.io.FileWriter;
import java.io.PrintWriter;
import java.io.IOException;
Your new class should look like this:
Importing the FileWriter and PrintWriter
Again, the underlines are because we haven't used the imported classes yet.
When you write to a file, you can either start from the beginning and overwrite everything. Or you can start at the end and append to the file. The FileWriter class allows you to specify which. We'll add a field that sets the append value for the FileWriter class. We'll also add a field to set the name of the file.
So add the following two fields to your code, plus the constructor:
The WriteFile constructor
The boolean field is called append_to_file and has been set to a value of false. This is the default value for the FileWriter class, and means you don't want to append, but erase everything in the file.
The constructor sets a value for the path field (instance variable), which is the name and location of the file. This will get handed over when we create a new object from our WriteFile class.
As was mentioned in the previous section, however, you can set up more than one constructor in your code. We can set up a second one and pass in an append value. That way, a user can either just use the first constructor and hand over a file name, or a file name and an append value. So add the following constructor below the first one:
public WriteFile( String file_path , boolean append_value ) {
path = file_path;
append_to_file = append_value;

}
This second constructor now has two values between the round brackets, a file path and an append value. If you want to append to the file you can use this constructor when creating a new object. If you just want to overwrite the text file then you can use the first constructor.
Your code window should now look like this:
Java code showing two constructors
To write to the file, add the following method below your two constructors:
public void writeToFile( String textLine ) throws IOException {

}

This method doesn't need to return a value, so we've made it void. In between the round brackets of the method name we have a String variable called textLine. This is obviously the text we want to write to the file. Again, though, we need to add "throws IOException" as we need to do something to handle file-writing errors.
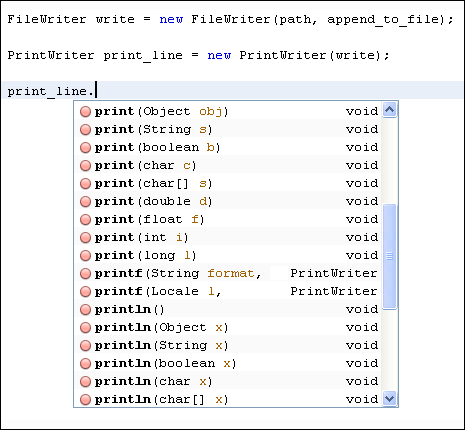
The first thing we need in the method is a FileWriter object. The FileWriter takes care of opening the correct file, and of storing the text as bytes. Add the following line to your writeToFile method:
FileWriter write = new FileWriter( path , append_to_file);
So we're creating a new FileWriter object with the name write. In between the round brackets of FileWriter we pass the name and location of the file, plus the append value. This will either be true (append to the file) or false (don't append). If a file of the name you pass over does not exist, the FileWriter creates one for you.
The FileWriter write bytes, however. But we can hand the FileWriter plain text with the aid of the PrintWriter class. The PrintWriter has a few handy print methods for this. But it needs the name of a FileWriter when creating the object from the class. So add this line to your method:
PrintWriter print_line = new PrintWriter( write );
Our PrintWriter object is called print_line. In between the round brackets of PrintWriter, we've added the name of our FileWriter object.
To add the text to a file, type the name of the PrintWriter object followed by a dot:
print_line.
As soon as you type the dot, NetBeans will display a list of available options:
Print options for the PrintWriter
There are an awful lot of print options on the list!
The one we'll use is one of the printf methods. This allows you to pass a formatted string of text to your PrintWriter. A good reason for using printf is to handle new line characters. The new line character differs, depending on which operating system you use. Windows will add the characters \r\n for a new line. But Unix systems just use \n. Using the printf function will ensure the correct encoding, no matter what the platform.
Add the following line to your code:
print_line.printf( "%s" + "%n" , textLine);
We've handed the printf method two things: a format for the text, and the string we want to write to the file. The two are separated by a comma. Notice the first of the two:
"%s" + "%n"
The %s between double quotes means a string of characters of any length. The %n means a newline. So we're telling the printf method to format a string of characters and add a newline at the end. The actual text that needs formatting goes after the comma. The printf method is quite useful, and we'll go through the options in more detail in a later section. For now, let's crack on.
Only one more line to add to your method:
print_line.close();
This line closes the text file and frees up any resources it was using.
Your WriteFile class should now look like this:
Java code for writing to a file
To test out your new class, go back to your FileData class (the one with the main method). Add the following line to create a new object from your WriteFile class:
WriteFile data = new WriteFile( file_name , true );
So we've set up a WriteFile object called data. In between the round brackets of WriteFile, we've added two things: the name of the file, and an append value of true. This will ensure that the second of the constructors we set up gets called. If we wanted to just overwrite the file, then the code would be this:
WriteFile data = new WriteFile( file_name );
Because we set the default append value as false, we only need the file name if we want to overwrite the entire contents.
To call the writeToFile method of your WriteFile object, add this line:
data.writeToFile( "This is another line of text" );
Feel free to change the text between the round brackets of the method.
To let the user know that something has happened, you can print something to the Output window:
System.out.println( "Text File Written To" );
Your FileData code should now look like this (we've added some comments):
Calling your WriteFile class into action
If you like, add another try … catch part for your text writing. Instead of the above, change it to this:
Error checking the WriteFile class
Now run your code to test it out. You should see the contents of your text file in the Output window followed by the message that the text file has been written to:
Output 1
Run the programme again and you should see the new line appear. (You can comment out the code that writes to the text file.)
Outptut 2
And that's it - you can now write to a text file and read its contents. In the next section, we'll move on and tackle programming with Java Forms.


Java - conversion from pdf to text

Converting PDF to text is an interesting task which has its use in many applications from search engines indexing PDF documents to other data processing tasks. I was looking for a java based API to convert PDF to text, or in other words a PDF Text parser in java, after going through many articles, the PDFBox project came to my rescue. PDFBox is a library which can handle different types of PDF documents including encrypted PDF formats and extracts text and has a command line utility as well to convert PDF to text documents.

I found the need to have a reusable java class to convert PDF Documents to text in one of my projects and the below java code does the same using the PDFBox java API. It takes two command line parameters, the input PDF file and the output text file, to which the parsed text from the PDF document will be written.

This code was tested with PDFBox 0.7.3 although it should work with other versions of PDFBox as well, it can be easily integrated with other java applications and can be used as a command line utility as well, the steps to run this code is furnished below.

Listing 1: PDFTextParser.java

1: /*
2:  * PDFTextParser.java
3:  * 
4:  *
5:  */
6:
7:  import org.pdfbox.cos.COSDocument;
8:  import org.pdfbox.pdfparser.PDFParser;
9:  import org.pdfbox.pdmodel.PDDocument;
10: import org.pdfbox.pdmodel.PDDocumentInformation;
11: import org.pdfbox.util.PDFTextStripper;
12:
13: import java.io.File;
14: import java.io.FileInputStream;
15: import java.io.PrintWriter;
16:
17: public class PDFTextParser {
18:
19:     PDFParser parser;
20:     String parsedText;
21:     PDFTextStripper pdfStripper;
22:     PDDocument pdDoc;
23:     COSDocument cosDoc;
24:     PDDocumentInformation pdDocInfo;
25:
26:     // PDFTextParser Constructor 
27:     public PDFTextParser() {
28:     }
29:
30:     // Extract text from PDF Document
31:     String pdftoText(String fileName) {
32:   
33:         System.out.println("Parsing text from PDF file " + fileName + "....");
34:         File f = new File(fileName);
35:   
36:         if (!f.isFile()) {
37:             System.out.println("File " + fileName + " does not exist.");
38:             return null;
39:         }
40:   
41:         try {
42:             parser = new PDFParser(new FileInputStream(f));
43:         } catch (Exception e) {
44:             System.out.println("Unable to open PDF Parser.");
45:             return null;
46:         }
47:   
48:         try {
49:             parser.parse();
50:             cosDoc = parser.getDocument();
51:             pdfStripper = new PDFTextStripper();
52:             pdDoc = new PDDocument(cosDoc);
53:             parsedText = pdfStripper.getText(pdDoc);
54:         } catch (Exception e) {
55:             System.out.println("An exception occured in parsing the PDF Document.");
56:             e.printStackTrace();
57:             try {
58:                    if (cosDoc != null) cosDoc.close();
59:                    if (pdDoc != null) pdDoc.close();
60:                } catch (Exception e1) {
61:                e.printStackTrace();
62:             }
63:             return null;
64:         }
65:         System.out.println("Done.");
66:         return parsedText;
67:     }
68:
69:     // Write the parsed text from PDF to a file
70:     void writeTexttoFile(String pdfText, String fileName) {
71:   
72:         System.out.println("\nWriting PDF text to output text file " + fileName + "....");
73:         try {
74:             PrintWriter pw = new PrintWriter(fileName);
75:             pw.print(pdfText);
76:             pw.close();  
77:         } catch (Exception e) {
78:             System.out.println("An exception occured in writing the pdf text to file.");
79:             e.printStackTrace();
80:         }
81:         System.out.println("Done.");
82:     }
83:
84:     //Extracts text from a PDF Document and writes it to a text file
85:     public static void main(String args[]) {
86:   
87:         if (args.length != 2) {
88:             System.out.println("Usage: java PDFTextParser  ");
89:             System.exit(1);
90:         }
91:   
92:         PDFTextParser pdfTextParserObj = new PDFTextParser();
93:         String pdfToText = pdfTextParserObj.pdftoText(args[0]);
94:   
95:         if (pdfToText == null) {
96:             System.out.println("PDF to Text Conversion failed.");
97:         }
98:         else {
99:             System.out.println("\nThe text parsed from the PDF Document....\n" + pdfToText);
100:             pdfTextParserObj.writeTexttoFile(pdfToText, args[1]);
101:         }
102:     }
103: }
Explanation:The above code takes two command line parameters, the input PDF file and the output text file, the method pdftoText in line 31 handles the text parsing functionality and the writeTexttoFile method in line 70 writes the parsed text to the output file.

Compliling and Running the code:I used PDFBox 0.7.3 to compile/run the above code, so you need to add those jars in your java project settings.

1. Download PDFBox 0.7.3 from here.
2. Unzip PDFBox-0.7.3.zip.
3. Under the PDFBox-0.7.3 folder, add the jars in the lib (PDFBox-0.7.3.jar) and external directory (other external packages used by PDFBox-0.7.3) to the classpath to compile/run the code, it should work fine.

Note: I used JDK 1.6 to compile the above code.


References:

Tuesday, 8 May 2012

Java String Tokenizer Example

The processing of text often consists of parsing a formatted input string. Parsing is the division of text into a set of discrete parts, or tokens, which in a certain sequence can convey a semantic meaning. The StringTokenizer class provides the first step in this parsing process, often called the lexer (lexical analyzer) or scanner. StringTokenizer implements the Enumeration interface. Therefore, given an input string, you can enumerate the individual tokens contained in it using StringTokenizer.
To use StringTokenizer, you specify an input string and a string that contains delimiters. Delimiters are characters that separate tokens. Each character in the delimiters string is considered a valid delimiter—for example, ",;:" sets the delimiters to a comma, semicolon, and colon. The default set of delimiters consists of the whitespace characters: space, tab, newline, and carriage return.
The StringTokenizer constructors are shown here:
StringTokenizer(String str)
StringTokenizer(String str, String delimiters)
StringTokenizer(String str, String delimiters, boolean delimAsToken)
In all versions, str is the string that will be tokenized. In the first version, the default delimiters are used. In the second and third versions, delimiters is a string that specifies the delimiters. In the third version, if delimAsToken is true, then the delimiters are also returned as tokens when the string is parsed. Otherwise, the delimiters are not returned.
Delimiters are not returned as tokens by the first two forms. Once you have created a StringTokenizer object, the nextToken( ) method is used to extract consecutive tokens. The hasMoreTokens( ) method returns true while there are more tokens to be extracted. Since StringTokenizer implements Enumeration, the hasMoreElements( ) and nextElement( ) methods are also implemented, and they act the same as hasMoreTokens( ) and nextToken( ), respectively.
Here is an example that creates a StringTokenizer to parse "key=value" pairs. Consecutive sets of "key=value" pairs are separated by a semicolon.
// Demonstrate StringTokenizer.
import java.util.StringTokenizer;
class STDemo {
static String in = "title=Java-Rainbows;" +
"author=Emiley J;" +
"publisher=Rainbow.com;" +
"copyright=2012;";
public static void main(String args[]) {
StringTokenizer st = new StringTokenizer(in, "=;");
while(st.hasMoreTokens()) {
String key = st.nextToken();
String val = st.nextToken();
System.out.println(key + "\t" + val);
}
}
}
The output from this program is shown here:
title Java-Rainbow
author Emiley J
publisher Rainbow.com
copyright 2012

Monday, 7 May 2012

Email Address Validation using Regular Expression

Email Regular Expression Pattern

^[_A-Za-z0-9-]+(\\.[_A-Za-z0-9-]+)*@
[A-Za-z0-9]+(\\.[A-Za-z0-9]+)*(\\.[A-Za-z]{2,})$
Description
^   #start of the line
  [_A-Za-z0-9-]+ #  must start with string in the bracket [ ], must contains one or more (+)
  (   #  start of group #1
    \\.[_A-Za-z0-9-]+ #     follow by a dot "." and string in the bracket [ ], must contains one or more (+)
  )*   #  end of group #1, this group is optional (*)
    @   #     must contains a "@" symbol
     [A-Za-z0-9]+       #        follow by string in the bracket [ ], must contains one or more (+)
      (   #    start of group #2 - first level TLD checking
       \\.[A-Za-z0-9]+  #      follow by a dot "." and string in the bracket [ ], must contains one or more (+)
      )*  #    end of group #2, this group is optional (*)
      (   #    start of group #3 - second level TLD checking
       \\.[A-Za-z]{2,}  #      follow by a dot "." and string in the bracket [ ], with minimum length of 2
      )   #    end of group #3
$   #end of the line


Whole combination is means, email address must start with “_A-Za-z0-9-” ,
 optional follow by “.[_A-Za-z0-9-]“, and end with a “@” symbol. The 
email’s domain name must start with “A-Za-z0-9″, follow by first level 
Tld (.com, .net) “.[A-Za-z0-9]” and optional follow by a second level 
Tld (.com.au, .com.my) “\\.[A-Za-z]{2,}”, where second level Tld must 
start with a dot “.” and length must equal or more than 2 characters. 


Java Regular Expression Example

Here’s a Java example to show the use of regex to validate an email address.
 
 
package com.rainbow.regex;
 
import java.util.regex.Matcher;
import java.util.regex.Pattern;
 
public class EmailValidator{
 
   private Pattern pattern;
   private Matcher matcher;
 
   private static final String EMAIL_PATTERN = 
                   "^[_A-Za-z0-9-]+(\\.[_A-Za-z0-9-]+)*@
                   [A-Za-z0-9]+(\\.[A-Za-z0-9]+)*(\\.[A-Za-z]{2,})$";
 
   public EmailValidator(){
    pattern = Pattern.compile(EMAIL_PATTERN);
   }
 
   /**
    * Validate hex with regular expression
    * @param hex hex for validation
    * @return true valid hex, false invalid hex
    */
   public boolean validate(final String hex){
 
    matcher = pattern.matcher(hex);
    return matcher.matches();
 
   }
}


Here’s the unit test for above email validator.
package com.rainbow.regex;
 
import org.testng.Assert;
import org.testng.annotations.*;
 
/**
 * Email validator Testing
 * 
 *
 */
public class EmailValidatorTest {
 
 private EmailValidator emailValidator;
 
 @BeforeClass
        public void initData(){
  emailValidator = new EmailValidator();
        }
 
 @DataProvider
 public Object[][] ValidEmailProvider() {
  return new Object[][]{
   {new String[] {
      "mkyong@yahoo.com", "mkyong-100@yahoo.com",
                           "mkyong.100@yahoo.com" ,"mkyong111@mkyong.com", 
      "mkyong-100@mkyong.net","mkyong.100@mkyong.com.au",
      "mkyong@1.com", "mkyong@gmail.com.com"
              }}
   };
 }
 
 @DataProvider
 public Object[][] InvalidEmailProvider() {
  return new Object[][]{
   {new String[] {
      "mkyong","mkyong@.com.my","mkyong123@gmail.a",
      "mkyong123@.com","mkyong123@.com.com",
                           ".mkyong@mkyong.com","mkyong()*@gmail.com",
       "mkyong@%*.com", "mkyong..2002@gmail.com",
      "mkyong.@gmail.com","mkyong@mkyong@gmail.com", 
                           "mkyong@gmail.com.1a"
          }}
  };
 }
 
 @Test(dataProvider = "ValidEmailProvider")
 public void ValidEmailTest(String[] Email) {
 
    for(String temp : Email){
  boolean valid = emailValidator.validate(temp);
  System.out.println("Email is valid : " + temp + " , " + valid);
  Assert.assertEquals(true, valid);
    }
 
 }
 
 @Test(dataProvider = "InvalidEmailProvider", 
        dependsOnMethods="ValidEmailTest")
 public void InValidEmailTest(String[] Email) {
 
    for(String temp : Email){
     boolean valid = emailValidator.validate(temp);
     System.out.println("Email is valid : " + temp + " , " + valid);
     Assert.assertEquals(false, valid);
    } 
 } 
}

Reference

  1. http://en.wikipedia.org/wiki/E-mail_address
  2. http://tools.ietf.org/html/rfc2822#section-3.4.1
  3. http://www.mkyong.com/regular-expressions/how-to-validate-email-address-with-regular-expression


Sunday, 6 May 2012

Java Code - Listing files and Folders in a Directory

import java.io.*;

public class  DirListing{
  private static void dirlist(String fname){
  File dir = new File(fname);
    String[] chld = dir.list();
  if(chld == null){
  System.out.println("Specified directory does not exist or is not a directory.");
  System.exit(0);
    }else{
  for(int i = 0; i < chld.length; i++){
  String fileName = chld[i];
  System.out.println(fileName);
  }
  }
  }
  public static void main(String[] args){
  switch(args.length){
  case 0: System.out.println("Please Mention Directory.");
  System.exit(0);
  case 1: dirlist(args[0]);
  System.exit(0);
  default : System.out.println("Multiple files are not allow.");
    System.exit(0);
  }
  }